Walking Before You Run: Comprehensive Introduction to Redstone
Welcome to my first blog in this series on redstone for map makers. Here we will be looking at some of the key skills and concepts I have picked up whilst working on projects for Mental Block Gaming.
These entries will not be all-encompassing, but will provide a useful guide and reference point for map makers to come. I plan to explain the basics of redstoning, for those who have never touched it before, and quickly run up to some of the advanced components I have used for higher level creations.
I don’t claim to be the world’s best redstoner and would not be surprised if there are smaller and more efficient ways of doing these processes, however the aim of this blog is to provide a clear and accessible method of using advanced redstone for up-and-coming map designers.
In this entry, I wanted to cover the 6 basic components all map makers will use to create things for all types of map. These are: redstone wire, the redstone torch, the repeater, the comparator, the hopper, and the piston.
Redstone Wire
Redstone wire, or just redstone, is the most basic component to any circuit. Redstone wire has two primary states, much like any wiring in your computer or home: on and off. While these states dictate how redstone interacts with other components, there is a second property of redstone that becomes more important when you begin to look at comparators.
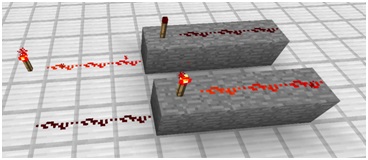
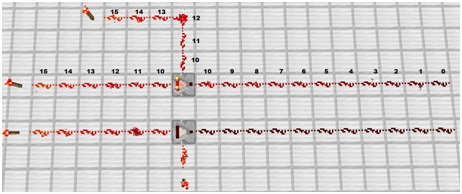
This is the power level of the wire, often referred to as the current. The power level of a wire is identifiable by the brightness of the wire. The maximum power a piece of wire can have is 15. This is the brightest colour of the wire and is always connected directly to a power source. As you begin to create a path away from the power source the power level of the wire decreases at a rate of 1 per wire as shown below.
 When this power level reaches 0, the wire is OFF and as such will not power devices or other components
The Redstone Torch
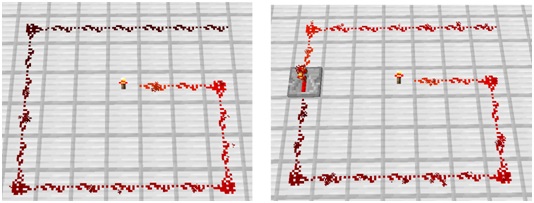
The redstone torch is a power source. It is commonly used for its ability to be placed both on blocks, as well as a block’s side. Other than being a power source, the redstone torch has some unusual but very useful properties. When the block a redstone torch is placed on receives power for another component, the torch is switched off.
This gives the redstone torch a very useful property, as it can be used to alternate circuits. This feature is used in the majority of advanced components and as such is an integral part to most Minecraft creations.
The Repeater
This component is an excellent tool for map creators. As it says on the tin, the primary function of a repeator is to ‘renew’ a redstone current. This means, that when powered from the rear, it emits a 15 strength power source from the front – continuing a circuit.
 This allows you to continue a redstone circuit for much further than 15 blocks, which can be very handy for redstone over a large distance!
The repeater is a diode. This means it is a component which will only allow current to flow in one direction. If an attempt is made to power the repeater from the output side, the repeater will remain off and not relay a signal. This can be very useful for combining multiple inputs to a circuit as well as other ideas. These will be touched on in later posts.

The secondary function of a repeater is a delay. Whilst on its standard setting when placed, right clicking the device will extend the rear torch backwards to one of 3 further positions. This delays the power from leaving the front of the device until the time set is waited.
On its standard setting the delay is 1 redstone tick (0.1 seconds) and for every right click you extend that delay by a further redstone tick, up to a maximum of 4 redstone ticks (0.4 seconds). These can be used in succession to create delays of many seconds for devices that work on a specific time.
Repeaters can be used to ‘charge’ blocks, making them act as a power source for redstone circuits. To do this, a repeater is placed facing into a block and is powered. This allows the block to power and redstone circuit or component touching the block.
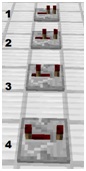
The final use of a repeater is a redstone latch, often referred to as a redstone lock. This more complicated use of the component is much less often used, however when required it can be very helpful. When a repeater is placed pointing at the side of another repeater (1), powering the first will lock the second into whatever state it is currently on. For example: The first repeater is powered and as such is outputting a signal to the wire in front (2). The second repeater is activated locking the first in the ON state (3). This means that if the first repeaters power source were to be removed (4), it would stay active until the lock is removed (5).
This can be done in reverse too, locking a repeater in the OFF state, so it does not relay a powered circuit until the lock is removed.
The Comparator
The comparator can be very helpful, but is often a complex component in circuits. With two active modes and a vast array of uses it is essential for advanced machines and contraptions.
Like the repeater, the comparator is a diode and will only send a signal in the direction of the arrow on its surface. The comparator, unlike the repeater, will output a current with the same strength as the input.
This means that if the wire inputting the comparator had a power level of 6, then the maximum output of the comparator would be power lever 6. The first mode, which is active when placing the comparator, is standard mode. This can be indicated by the OFF torch on the front of the comparator.
In standard mode the output of the comparator is either the maximum, or zero. This depends on the inputs to either side of the comparator. If the signal strength to the side of the comparator is greater than the input power, then the comparator outputs 0. If the signal strength to the side of the comparator is less than or equal to the input to the comparator, then the output is the strength of the input.
The second mode is subtractor mode. This can be activated by right clicking the comparator and is indicated by the lit torch at the front of the component. In this mode, the output of the device is equal to the input minus the greater of the two side inputs.
| Example A | Example B |
|---|---|
| Example A: Input = 12 | Example B: Input = 12 |
| Largest Side Input = 8 | Largest Side Input = 11 |
| Output = (12-8=) 4 | Output = (12-11=) 1 |
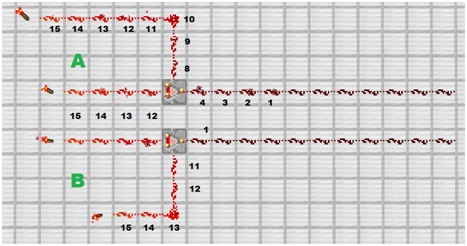
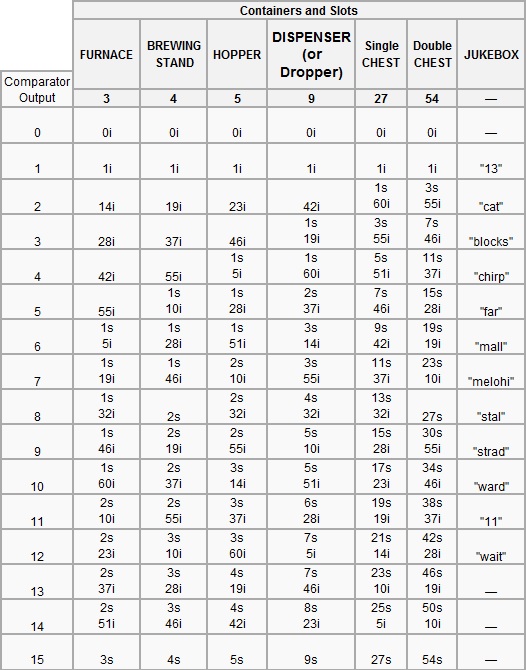
Comparators can also be used to test how full a container, such as a chest or hopper, is. When placed pointing out of a container in any mode the comparator will output a signal based on how many items are inside. A quick guide to these unique numbers of items can be found below: (i means items, s means stack)
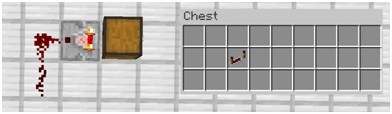 A single chest with one item in will output with a power of 1
The final use of a comparator we will cover is the true or false utility. A comparator that is pointing out of a command block will output a signal based on the command that has been run.
For example, if we run the command “/testfor @a[r=4]” (which is a command to test if any players are within 4 blocks – more on commands in a later post!) and two players are found in the area, the comparator connected will output with a power of two. With other commands that are true or false, the comparator will output with either a 0 power if the statement is false or a 1 if it is true.
This can be exceptionally useful when attempting to activate redstone when an item is held, or when all players are in a required area for example. However, be warned that like all redstone, this has a maximum output of 15.
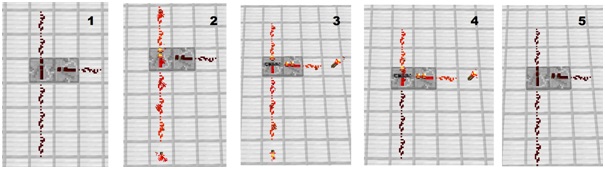
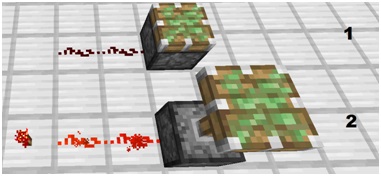
Example: Command tests for creepers within 10 blocks.
 /testfor @e[type=Creeper,r=10]
/testfor @e[type=Creeper,r=10]Image 1: Creepers: 1, Comparator Output Strength: 1
Image 2: Creepers: 2, Comparator Output Strength: 2
Image 3: Creepers: 4, Comparator Output Strength: 4
The Hopper
The hopper is a device used for transferring items. When not connected to a power source or charged redstone wire, the hopper will transfer items to any connected container at a rate of 2.5 items per second (or 0.4s per item).
The hopper will feed into the block which you right click on when you create the hopper. To feed the hopper into interactive items such as a chest, shift right click on the receiving container. Whilst this is occurring, the hopper will also attempt to suck objects from any container located above it at the same rate.
This can be useful for sorting items or creating chests that only accept a certain type of item (more on this later). When a hopper receives a redstone current transferring stops in both directions, and as such the hopper will solely act as a container and have no additional properties. This can be useful to prevent a hopper from taking items after a certain task has been completed.
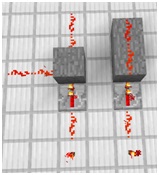
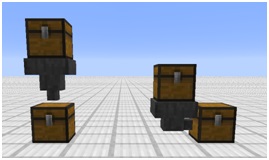
Below left is an example of a hopper that will remove items from the top chest and deposit them in the lower chest. Below right is an example of a hopper that is angled to deposit items to the right, or in this case, into the lower chest.
The Piston
The piston is a simple but very effective tool for map makers. It allows you to move a single block by one in a specified direction. Pistons are either inactive, when the head of the piston is against the body (1), or active, when the head is extended by one block (2).
In our maps the piston is rarely used outside of its basic use to move a block that the user can jump to/from. This reason is two-fold: firstly, pistons make a noise when extending or retracting which can detract from immersion and cause the player to think about the redstone behind a device, and secondly, whilst sticky pistons are the preferred piston due to their reset-ability, they take two redstone ticks to move. Using multiple pistons can create a longer than desired delay to a device, again ruining the player’s immersion.
This concludes my blog on basic redstone components. This knowledge forms the basis of future redstone tutorial, so make sure that you’re familiar with these aspects before moving on to more complicated redstone.
Next up: Thinking Outside the Blocks: A Guide to Advanced Redstone Components, featuring complex systems based on the basic systems explained here.
