Importing Custom Sounds into Minecraft
Ever wanted to replace the default door sound with a long creaking effect for your horror adventure map? Or add fast-paced music to your parkour map? Or add a countdown sound effect for your multiplayer racing map? Well now you can!
As of Minecraft 1.7, it is possible to add custom sounds to your game through the use of resource packs. This functionality grants Minecraft Adventure Map makers the ability to put sound effects and voice-acting into their games. This tutorial carefully guides map makers through the normally complicated process of adding sounds to resource packs to make your games even better, either by replacing default Minecraft sounds or by adding your own library of sounds to the game!
For this tutorial, we will require Audacity, an excellent audio editing program, and Mental Block Gaming’s own program, the JSONator, both of which are free and easy to use! Of course, we will also need some sound files to work with. We will be using this example resource pack for demonstration purposes. (More information about the creation of the JSONator can be found here. If you’re having trouble running it, try installing Microsoft’s Visual F# 3.1.2 here.)
 When multiple resource packs are selected, the top resource packs take priority
If you want to simply replace the game files with sounds of your own, you can overwrite the files used in the resource pack with a sound file of your own with the same name and format. If your resource pack is equipped in game, it will play your sound instead of Minecraft’s default sound.
We will be using Audacity to convert our sound files, which are usually .mp3 or .wav files, into .ogg files that Minecraft can understand. In Audacity, go to “File” -> “Open…” and select your sound file. A visual representation of the sound should now be visible on the screen. Navigate to “File” -> “Export…” to save your sound in its new format. (Note: We do not want to use “Save project…” here.) Choose a name for your sound. It is best to choose a name that is written in all lower case, does not use any special characters, such as exclamation marks, commas, or asterisks, and does not contain any spaces. Instead of “Big Explosion!” for example, use “bigexplosion”. Before you hit the save button, select the “Save as type” dropdown bar and select Ogg Vorbis Files from the list. NOW you can save your sound effect in its new format!
To add this sound to your game, all you need to do is replace Minecraft’s default sound with your new sound in your resource pack. So, if a zombie groan was what you wanted to replace, navigate to [your resource pack name] > assets > minecraft > sounds > zombie and replace say1.ogg with your zombie sound. Delete the old say1.ogg and rename your .ogg file to say1, paste it into the folder, and it’s in place! For a full list of default Minecraft sound filenames and locations, check out the Minecraft wiki.
But what if we want to add a completely new sound, instead of simply replacing one? Once you have converted all of the sound files that you want to use into the .ogg format, put them into a new folder. For now, let’s call this folder “Sound Effects”. It is worth noting that extremely long custom sounds will often cause the player’s Minecraft to crash, so try to keep sound files under a minute long.
// What the sounds.json file looks like

{
  "pycella18": {
    "sounds": ["custom/pycella18"]
  },
  "pycella19": {
    "sounds": ["custom/pycella19"]
  },
  "raelyn02": {
    "sounds": ["custom/raelyn02"]
  },
  "raelyn03": {
    "sounds": ["custom/raelyn03"]
  },
  "raelyn04": {
    "sounds": ["custom/raelyn04"]
  },
  "raelyn05": {
    "sounds": ["custom/raelyn05"]
  }
}
For the next part of this process, we will need to use the JSONator. (Note: if you feel uncomfortable using the JSONator, you can write the code by hand using this tutorial.) This custom-built program produces a special file called “sounds.json” that the game uses to read your custom sounds. This JSON file gives Minecraft a new command which can play your custom sound, and also tells it what keyword should be used to play this new sound. In other words, if you type “bigexplosion” into the game, it knows that you are talking about your bigexplosion.ogg file. With the JSONator v2, it is now possible to also associate each of your sound effects with a volume slider within Minecraft. In Mental Block Gaming’s maps, for example, all character voiceovers are controlled by the “players” volume slider. In order to associate your sounds with one of the eight volume sliders, simply create a folder called either “ambient”, “weather”, “player”, “neutral”, “hostile”, “block”, “record” or “music” within your Sound Effects folder. Note that any files not sorted into specific folders can only be controlled by the master volume slider. Simple!
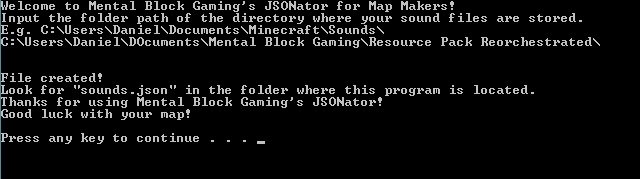
What is not so simple is the layout of the JSON. JSONs can be written by hand, but they can be a little complicated to understand, and in a game as big as Templars of Hyrule which has over 619 custom sounds this process can quickly become a chore. To remedy this, we have produced a program which neatly creates a JSON file for you – the JSONator! Simply double click JSONator.exe to open the program, then input the location of the folder where all of your sound files are stored and it will create the JSON for you. (If you are unsure what the location of your sound effects folder is, right click on the folder and choose Properties to find out. My folder location is C:\Users\Daniel\Documents\Sound Effects.) Type the location of this folder into the JSONator. Press enter and the program should tell you that it has created a sounds.json file which is stored in the same folder as the JSONator. (Note that it does not save in the same location as your sound files.)
 Mental Block Gaming’s very own JSONator!
Now that we have our .ogg sound files and our sounds.json file, we are ready to start compiling them into a resource pack! Take the Custom Sounds sample resource pack you downloaded earlier and unzip it. Navigate to Custom Sounds > assets > minecraft. This is the folder that the sounds.json file we just created needs to go into. Copy and paste your sounds.json file here. The sounds.json file in there is currently only set up to play countdown.ogg. Simply overwrite this sounds.json file with your own version. After you have done that, continue navigating to the sounds folder, then custom. Inside this custom folder you should place all of your .ogg sound files that you want to appear in the game.
Resource packs must be zipped for Minecraft to read them. To zip your folder, go back to your Custom Sounds folder and select the assets folder, the pack.mcmeta file and the pack.png preview image. Right click and choose “Send to…” > “Compressed (zipped) folder”. This will create a new zipped folder which can be found in the same folder. You’ll want to change the name of the zipped folder to the name of your game so that players can identify which resource packs belong to which maps. Now you have your resource pack ready to put into the game for yourself and other players!
In order to try out your new resource pack, we need to equip it. Open up Minecraft, then go to “Options” > “Resource Packs” > “Open Resource Pack Folder”. Copy and paste your .zip folder of your resource pack into this folder. In Minecraft, select the resource pack by moving it to the list on the right hand side. (Note that if you have multiple resource packs equipped, you should ensure that your resource pack is the one on top.) With the resource pack enabled, open up a Single Player world. If cheats are not enabled, in the options screen open the world to LAN and allow cheats. Set yourself to creative mode by typing “/gamemode c” in the chat console. Now if I want to play countdown in game, I can simply type “/playsound countdown master @p”. This command will play the sound to the nearest person (i.e. yourself). Cool, right? You now have your very own custom sounds in game!
The playsound command is fairly straightforward to use. The syntax for the playsound command is as below:
/playsound <sound> <source> <player> [x] [y] [z] [volume] [pitch] [minimumVolume]An example of a playsound command would be as follows.
/playsound countdown block @a 123 26 75 2 0.5 0.1This command will play the sound “countdown” to all players (@a) at the coordinates (123,26,75). Block means the volume slider of block will effect how loud this sound is. The volume is twice the usual volume, meaning it is audible from twice the normal distance. Its pitch is 0.5, which means that the sound is slowed down and the pitch is lowered. The minimum volume of the sound is 0.1, meaning that even if you aren’t in the audible range of the sound, it will still play at 10% volume. (Note that the only essential parts of the code are /playsound, the sound ID, and the person to whom the sound is played. If no coordinates are given, the sound will play from the command block’s coordinates.)
Now all that remains is for you to put the command into a command block and attach it to a redstone circuit. For more information about redstone, check out Duskreaper’s informative redstone tutorials.
And that concludes this post on custom sounds! Get out there and get creating! One final word of warning: remember to be careful when using sound files that don’t belong to you. Always give credit where credit is dude. If you have any queries about any part of this tutorial, don’t hesitate to leave a comment below or send us an email.
Download Links
